
Looking for a fun way to celebrate the holidays? The 12 Days of Christmas Nail Art Challenge is perfect for you. Each day brings a new design inspired by the iconic Christmas carol, letting you unleash your creativity.
Whether you’re a nail art pro or a complete beginner, this challenge has something for everyone. You’ll get to sharpen your skills, enjoy daily bursts of joy, and showcase a dazzling array of holiday-inspired nails.
Why Should You Join This Challenge?
This challenge is a must-try during the holiday season for several reasons. First, it inspires fresh ideas and helps you learn new techniques. Plus, it connects you with others who share your passion for creative, festive nail art.
Here’s why you’ll love it:
- Spark Creativity Daily: Festive prompts encourage imaginative designs.
- Refine Your Nail Art Skills: Each task is manageable, helping you improve without stress.
- Showcase Seasonal Style: Your nails will be a stylish conversation starter.
- Be Part of a Community: Use hashtags like #12DaysOfNailArt to share and find inspiration.
For even more nail art inspiration, check out Elle’s stunning holiday nail ideas or explore Allure’s guide to winter nail trends.
12 Days of Festive Nail Art Ideas
Here’s a detailed guide to your 12-day adventure, each with tips to make your nails shine while keeping things simple.
Day 1: Partridge in a Pear Tree
Begin with a pear-green base for a fresh and festive vibe. Add metallic bird decals or hand-draw delicate branches to create depth. Include small gold or white pear shapes on one accent nail for that extra holiday charm.
Day 2: Turtle Doves
Use a dove-gray polish as a serene and elegant base. Add white feather motifs or soft snowflake designs to elevate the look. To enhance the wintery feel, sprinkle a bit of silver glitter for a frosty finish.
Day 3: French Hens
Reimagine French tips with festive flair by using deep red polish for the tips and white polka dots as accents. On one nail, add a tiny hen silhouette or an egg design for playful charm.
Day 4: Calling Birds
Create a dramatic base with black polish and golden flecks for a starry effect. Add silhouettes of birds perched on branches to emphasize the theme. If you prefer a polished finish, use gold stamping plates for intricate bird details.
Day 5: Five Golden Rings
Go bold with glittery gold polish for a luxurious feel. On one or two nails, add rhinestone “rings” for extra glamour. To enhance the jewelry-inspired design, outline some nails with gold foil tape.
Day 6: Geese a-Laying
Opt for a sleek eggshell-white base to highlight a minimalist yet chic foundation. Add metallic gold accents or hand-paint tiny goose silhouettes for a whimsical touch. Alternatively, swirl white and gold polish to mimic an elegant marbled effect.
Day 7: Swans a-Swimming
Recreate serene water scenes with a blue-and-white water marble technique. Add swan silhouettes on accent nails to highlight the theme. For a regal finish, include golden crown decals or use metallic polish on a single nail.
Day 8: Maids a-Milking
Start with creamy white polish to reflect the simplicity of milk. Add dripping milk designs or tiny glass sketches for a playful touch. Incorporate small brown cookie shapes on one nail for added Christmas vibe.
Day 9: Ladies Dancing
Combine vibrant red nails with glitter swirls to mimic the graceful motion of dancing. Add a gold or silver ballet slipper design to accent nails for an elegant touch. Rhinestones can elevate the look and add sparkle.
Day 10: Lords a-Leaping
Choose a royal purple polish to create a majestic base. Add gold accents like crowns or laurel wreaths for sophistication. To finish, use a matte topcoat to create a luxurious, velvet-like texture.
Day 11: Pipers Piping
Use red, white, and metallic silver stripes to create a chic candy-cane effect. Draw tiny musical notes or flutes on one nail for an extra holiday twist.
Day 12: Drummers Drumming
Bold red-and-black nails set the stage for a striking design. Add tiny drumsticks or drum patterns to emphasize the theme. Glitter or rhinestones provide the perfect finishing touch to enhance the sparkle.
Tips to Nail This Challenge
To achieve stunning results, follow these helpful tips:
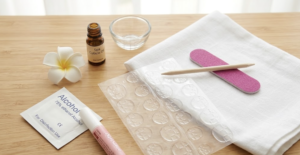
- Start with Proper Prep
Clean, buff, and shape your nails to create a smooth canvas. Always apply a durable base coat to protect your nails. - Use Tools Creatively
Nail brushes, dotting tools, and tape help create precise lines. If you lack professional tools, household items like toothpicks work perfectly. - Embrace Simplicity
If you’re short on time, focus on accent nails. A single well-crafted design can make a bold statement. - Protect Your Designs
Finish each manicure with a high-shine topcoat to seal the design and prevent chipping.
Celebrate the Holidays with the 12 Days of Christmas Nail Art Challenge
The 12 Days of Christmas Nail Art Challenge offers a festive and exciting way to embrace the holiday season. Each prompt inspires you to try new techniques and experiment with unique, cheerful designs. As you work through the challenge, you’ll build confidence and create nails that spread joy wherever you go.
Don’t wait—start your nail art adventure today! For more inspiration and tips, visit our easy beginner nail art tutorials and keep those creative ideas flowing.
FAQs
Q: Do I have to use professional tools?
A: Nope! Household items like toothpicks, tape, and even old eyeliner brushes can work wonders.
Q: What if I miss a day?
A: No worries—jump back in where you left off or combine designs into one look.
Q: Can I do just one nail per day?
A: Absolutely! Accent nails are a fabulous way to keep it simple and stunning.
Q: Do I have to follow the prompts exactly?
A: Nope—these are starting points. Feel free to interpret them your way.
Q: How can I make my designs last longer?
A: Seal with a high-quality top coat and avoid using your nails as tools.
Q: What hashtag should I use?
A: Try #12DaysOfNailArtChallenge and #ChristmasNails2024 to share your creations.