
Cherry blossom nails are a timeless trend, but new and advanced techniques can and will take them to the next level! If you’ve already mastered the basics earlier, then now is the perfect time to refine your cherry blossom artistry. This guide covers expert-level methods to enhance your floral designs. You’ll learn how to paint micro blossoms, layer petals, and create delicate branches with precision. These techniques will bring elegance and add more depth to your nail art.
Take Your Cherry Blossoms Nails to the Next Level
Want to create more intricate, professional-looking cherry blossom nails? These advanced techniques will help you achieve flawless and artistic finishes.
Mastering Micro Blossoms
Microblossoms add an exquisite touch to the cherry blossoms art in your nails. They require precision so using the right tools is essential. A fine-liner brush with ultra-thin bristles allows for detailed strokes, while slightly diluted gel polish ensures a smoother application.
To achieve a more natural look, vary the size and shade of each petal. A dotting tool helps create tiny buds that mimic different bloom stages. Once you complete the flowers, seal them with a high-shine top coat to enhance dimension and longevity.
For more precision tips, check out this guide on nail art brushes.
Layering for a 3D Blossom Effect
Layering petals creates added depth and enhances realism in your nail art. Instead of adding all petals at once, build them gradually. Begin with a sheer pink base. Then, add translucent petals in thin layers, curing each one before painting the next.
Enhance the effect further by highlighting petal edges with a small amount of white gel polish. This subtle detail makes the flowers appear more lifelike. Mixing matte and glossy finishes adds contrast and makes your design more eye-catching.
If you want to explore more layering techniques, Scratch Magazine has great tips.
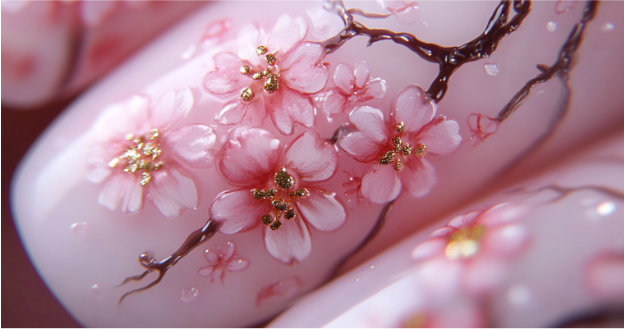
Fine Branch Work: Creating Flow and Movement
Branches provide structure to cherry blossom nails, but they should never overpower the flowers. Use a long striper brush and apply a deep brown or soft gray polish to achieve a natural look. Drag the brush lightly to create thin, curved lines. Avoid making them too straight or thick, as this can make your design appear rigid.
Use a tiny amount of black gel polish to create soft shadows. A subtle gold accent also enhances elegance without taking away attention from the flowers. Keeping each line delicate ensures better balance within the design.
For more fine-line techniques, check out this detailed tutorial.
Adding Negative Space for a Modern Look
Negative space can provide your cherry blossom nails a more sophisticated touch. Instead of covering the entire nail, focus on one side and leave sections of the natural nail exposed to create a light, airy effect.
Add movement by using a sponge or blooming gel to create scattered petals. Then, apply small dots of pink polish and let them spread naturally. This technique mimics the look of falling petals and enhances the overall design.
Final Touches
After completing your design, check for balance. Adjust any elements if they appear too uniform to maintain an overall natural look. Even small refinements can make a big difference.
For a soft, elegant finish, apply a velvet matte top coat. If you prefer a vibrant appearance, a high-shine top coat will make the colors stand out. Experimenting with both can add variety and sophistication to your nails.
Elevate Your Cherry Blossom Nails with Advanced Techniques
With the right approach, cherry blossom nails can transform from simple floral patterns into stunning works of art. You can create elegant and intricate designs by mastering micro blossoms, layering petals, and refining branch details. Whether you prefer delicate minimalism or detailed artistry, these expert techniques will enhance your nail skills.
Which of these methods will you try first? Share your thoughts in the comments below!
FAQs
1. What tools do I need for detailed cherry blossom nail art?
A fine-liner brush, dotting tool, gel polish in pink and brown shades, and a top coat for sealing the design.
2. How can I make my cherry blossoms look more natural?
Vary petal sizes, blend different pink tones, and use white highlights to enhance dimension.
3. What’s the best way to paint delicate branches?
Use a long striper brush with light pressure. Avoid thick, straight lines to maintain a soft, organic appearance.
4. Can I create this design with regular nail polish instead of gel?
Yes, but gel polish allows for finer details and better layering. Work quickly with regular polish before it dries.
5. How do I prevent my micro blossoms from smudging?
Cure each layer separately if using gel. If working with regular polish, wait for each layer to dry completely before proceeding.
6. What top coat should I use for cherry blossoms nails?
A glossy top coat enhances colors, while a matte finish provides a soft, elegant effect.
7. Can I add shimmer or metallic accents to this design?
Absolutely! A small amount of gold or shimmer can elevate the overall look without overwhelming the design.
8. How do I create soft, blended petals?
Use a sheer base color and layer translucent pink petals. A sponge or blooming gel can help soften the edges.
9. What’s the easiest way to create falling petals?
Use a dotting tool to apply tiny pink dots, then let them spread naturally to resemble drifting petals.
10. How long does this nail art take to complete?
Depending on complexity, expect to spend 45–90 minutes for an advanced design.