
Last Updated: July 2026
Easter nail art comes down to three moves: a pastel base, a bunny motif, and a speckled or hand-painted egg finish. This piece walks through all three, plus two advanced techniques for anyone who wants to push further. Every step below has a time attached to it, not a difficulty rating.
Quick Answer
Easter nail art is a spring manicure built on pastel color, a bunny motif, and a speckled or hand-painted egg design. A first attempt at a pastel ombre or speckled egg set takes about 15 to 30 minutes. Sculpted bunny ears in builder gel take about 40 minutes and need a UV or LED lamp, so that one sits in the advanced tier.
Key Takeaways
- Pastel color, bunny motifs, and speckled eggs are the three core elements of Easter nail art.
- A speckled egg design takes about 15 minutes for a first attempt. It’s the fastest design in this piece.
- 3D bunny ears and gold foil need builder gel or foil adhesive, so they belong in the advanced tier.
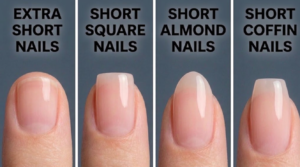
- Short and square nails hold speckled and painted detail longer than long nails do. There’s less surface for the polish to crack across.
- A soak-off acetone step is only needed if you used gel or builder gel. Regular polish comes off with remover.
Best For
- Nail length: any length. Short and square holds detail the longest.
- Skill level: pastel ombre and speckled eggs for a first attempt. Bunny accents and watercolor eggs for a second or third set. 3D bunny ears and gold foil for practiced hands.
- Season or occasion: Easter week, spring brunches, egg hunts, family photos.
- Tools: a makeup sponge, a dotting tool or a bobby pin, a clean toothbrush, a fine liner brush. A UV or LED lamp is only required for the builder gel step.
Result
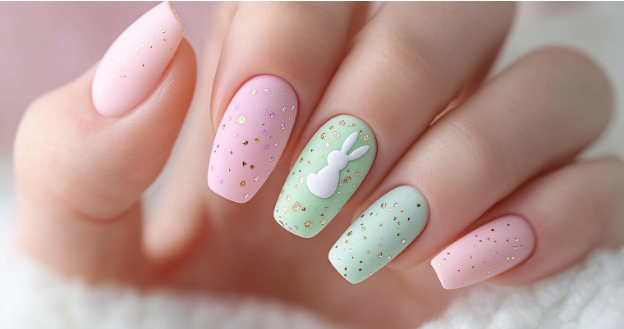
This is the speckled egg set at fifteen minutes in. Pale mint base, brown speckling, glossy top coat. Nothing on this hand needed a lamp.
Reality
Here’s what the fifteen minutes actually looked like. The toothbrush flicked polish onto two fingertips before I got the angle right. The bunny ears on the accent nail went on crooked twice before they sat straight. That’s normal. It’s not a sign you’re doing this wrong.
Tutorial Steps
1. Pastel Ombre (about 20 minutes)
You’ll need: two pastel polishes, a makeup sponge, base coat, top coat.
- Apply a base coat. Let it dry for 2 minutes.
- Paint the whole nail in your lighter pastel. Let it dry for 3 minutes.
- Sponge the second pastel color onto the tip in one thin layer.
- Dab the sponge onto the nail two or three times to blend the edge.
- Seal with top coat. Let it cure for 5 minutes before you touch anything.
2. Bunny Accent Nail (about 25 minutes for one nail)
You’ll need: pastel base polish, white polish, black polish, pale pink polish, a dotting tool or a bobby pin, a fine liner brush.
- Paint the base color. Let it dry fully, about 5 minutes.
- Dot one white circle near the tip for the head.
- Paint two thin white ovals above the circle for ears. Let them dry for 2 minutes.
- Outline the ears with the liner brush in a soft gray or the base shade.
- Add two black dots for eyes and one pink dot for the nose.
- Seal with top coat.
3. Speckled Egg (about 15 minutes)
You’ll need: pastel base polish, a clean toothbrush, brown or black polish, top coat.
- Paint the base color. Let it dry for 5 minutes.
- Thin a small amount of brown or black polish with a drop of polish remover.
- Dip the toothbrush bristles into the thinned polish.
- Hold the brush an inch from the nail and flick the bristles with your thumb.
- Let the speckles dry for 5 minutes, then seal with top coat.
4. Watercolor Egg (about 30 minutes)
You’ll need: white base polish, two or three pastel polishes, a damp nail art brush.
- Paint a solid white base. Let it dry for 5 minutes.
- Load the damp brush with one pastel color, then blot most of it onto a paper towel.
- Brush the color on in short strokes, letting white show through.
- Add a second color while the first is still tacky, overlapping the edges.
- Let it dry for 10 minutes before you add top coat.
5. Gold Foil Accent (about 20 minutes, added to any base design)
You’ll need: foil adhesive or a tacky top coat, gold leaf foil sheets.
- Finish your base design and let it cure completely.
- Paint foil adhesive where you want the gold. Let it sit until tacky, about 2 minutes. Not wet, not fully dry.
- Press the foil sheet on, shiny side up.
- Peel the foil away slowly. The gold stays where the adhesive was.
- Seal with top coat.
6. 3D Bunny Ears (about 40 minutes, needs a UV or LED lamp)
You’ll need: builder gel, a small sculpting brush, a UV or LED lamp, gel base and top coat.
- Apply a thin base coat of builder gel. Cure per your lamp’s spec, usually 30 to 60 seconds.
- Pick up a small bead of gel and shape two thin ears off the edge of the nail.
- Cure fully. Under-cured gel stays tacky and won’t hold its shape.
- Paint the ears pink or white once cured.
- Seal the whole nail, ears included, with gel top coat and cure again.
Design Variations
- Short or square nails: the speckled egg and pastel ombre hold up best here. Less surface means fewer places for the polish to crack.
- Almond or longer nails: the bunny accent and watercolor egg have more room to read clearly.
- Press-on version: paint or foil the design on the tip before you glue it down, off the hand, and let it cure fully first. This skips wear and tear on the natural nail.
- Gel version: swap regular polish for gel color and cure each layer under a lamp instead of air-drying. Wear time goes from about 5 days to 10 to 14.
Mistakes to Avoid
If your speckles turned into blobs, your polish was too thick. Thin it with one more drop of remover before you flick the brush again.
If the bunny ears won’t sit still while they dry, you’re loading too much polish per stroke. Use two thin coats instead of one heavy one.
If the foil won’t stick, the adhesive dried too long before you pressed it on. Foil goes down while the adhesive is tacky, not once it’s dry.
If the gel bunny ears feel soft after curing, your lamp doesn’t match the gel’s spec. Check the wattage on the bottle against your lamp before you build the second hand.
If the whole set chips by day three, a layer didn’t fully dry or cure before the next one went on. Every layer needs its full time, even the ones that feel dry to the touch.
Salon Math
A hand-painted Easter set at a salon runs about $50 to $65 for the design work, on top of the base service.
Verdict
Worth it: the speckled egg. Fifteen minutes, no lamp, and it holds. Skip the 3D bunny ears for a first attempt. Builder gel without a matched lamp is where most sets fail, and that’s an expensive first lesson.
FAQs
What colors work best for Easter nail art? Pastel pink, lavender, mint, and pale yellow read as spring without leaning into a full holiday theme. Deeper jewel tones work for an egg design if you want more contrast in the speckling.
How do you get a speckled egg effect? Thin brown or black polish with a drop of remover, dip a clean toothbrush, and flick the bristles with your thumb about an inch from the nail. Full steps are above.
How long does Easter nail art take? Fifteen minutes for a speckled egg. Twenty to thirty minutes for an ombre, watercolor, or foil accent. Forty minutes for 3D bunny ears, plus lamp cure time.
Can you do Easter nail art without a UV or LED lamp? Yes. Every design here except the 3D bunny ears uses regular polish and air-drying. Only builder gel needs a lamp.
How do you keep a hand-painted design from chipping? Let every layer finish its full dry or cure time before the next one goes on. Most early chipping traces back to a rushed layer, not the design itself.
What’s the fastest Easter design for a first attempt? The speckled egg. It’s one base color, one flick technique, and about fifteen minutes.
Sources and References
- American Academy of Dermatology, general nail care guidance on moisturizing and safe removal: aad.org/public/everyday-care/nail-care-secrets/basics
- American Academy of Dermatology, gel manicure and UV lamp guidance, relevant to the builder gel step: aad.org/media/news-releases/gel-manicures-dermatologists-share-tips-to-keep-nails-healthy
- Manucurist, 2026 Easter nail color and design trend roundup: us.manucurist.com/blogs/journal/easter-nails-ideas