
Last Updated: July 2026
Paper designs are super pretty and unique. This tutorial will show you just how easy it is to create this interesting paper transfer nail art!
Paper transfer nail art uses newsprint or magazine paper pressed onto wet polish to pull the ink onto your nail. You don’t need an airbrush, a stamping kit, or steady hands for freehand line work. You need white polish, rubbing alcohol, and paper you don’t mind cutting up.
This guide walks through the full process, what it looks like when it goes wrong, and how to fix it without starting over.
Key Takeaways
- Rubbing alcohol pulls a clearer, sharper print than water.
- Newspaper, magazine cutouts, and printed paper all work. Thinner paper with heavier ink transfers best.
- A slight gray tint on the nail afterward is normal. It fades once top coat goes on.
- The design holds about as long as a standard manicure: five to seven days with a solid top coat.
- This is a polish-and-paper technique. No gel, lamp, or acrylic system involved.
| Best for | |
| Skill level | Beginner. No brush control needed. |
| Nail length | Any length. Works well on short nails, where there’s less surface to worry about smudging. |
| Season/occasion | Good for a low-cost refresh or a themed look (holiday paper, event programs, sheet music). |
| Tools required | None beyond polish, alcohol, and paper. No lamp, no drill. |
| Time | About 20 minutes for a full set, plus 5 minutes drying before top coat. |
Here’s An Easy Paper Transfer Nail Art Tutorial
A paper transfer nail art is a neat technique to create a unique nail art design. It doesn’t need a lot of materials or time to finish, unlike the water marbling or gel manicures. You don’t have to be super artistic to pull this look off either. All you’ll need is some rubbing alcohol (or water!) and a little patience for this nail art design. With this tutorial, you can use newspapers, magazine cutouts, and even colorful paper designs to create art on your nails.
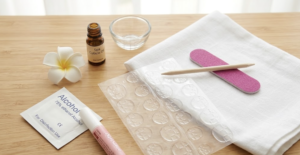
What you’ll need for this paper transfer nail art tutorial:
- White color nail polish
- Base coat
- Rubbing alcohol
- Small cup
- Newspaper clippings or colorful design of your choice (Cut into small squares)
- Nail polish topcoat
Step 1: Start With A Basecoat And Base Color
First off, paint your nails with a basecoat to protect your nails. Apply an opaque white base to serve as a nice canvas. Wait until your nails are dry before moving on to the paper transfer nail art.
Step 2: Soak Your Finger In The Cup With Alcohol
Pour your alcohol into a small cup, then soak your finger. You can also use water but rubbing alcohol gives a clearer transfer.
Step 3: Press The Paper Onto The Nail
Immediately press one of the paper squares onto your nail with the image facing down. Wait about 30 seconds and remove carefully. The longer you press it the clearer the design will be.
Do the same technique on all the other nails. Make sure not to move the paper around to prevent smudges.
Step 4: Protect With Top Coat
Wait for about 5 minutes before applying a top coat. This will help protect the design and make your nail art look pretty and glossy.
Here’s the finished product!
You’ll notice your nails will also turn a little grayish. It depends on the kind of paper you’ll use. Here’s what it will look like after!
Paper Transfer Nail Art Ideas
Do you want to see other paper transfer nail art designs? Here are my top picks!
1. Burned Paper Nails
This paper transfer nail art is fierce! It has this burned effect that will surely make others wonder how’d you do it?
2. Flowers And Paper Transfer
I love the simplicity yet elegance of this design. Create roses and flowers on top of your paper transfer nails!
3. Japanese Newspaper
You can experiment with various media like magazines and even foreign newspapers. This Japanese paper transfer nails are cute!
Common Mistakes and How to Fix Them
If the print looks faint → the paper didn’t sit long enough, or the alcohol dried out. Press for the full 30 seconds and keep the nail wet.
If the design smudged → the paper moved during the press. Hold your hand still and don’t check it early.
If your nail looks grayish afterward → that’s normal. It’s residual ink from the paper and it fades once top coat seals it.
If the paper won’t lift off clean → you waited too long. Peel within a minute of pressing, while the polish is still slightly tacky.
How Long Should You Wait Before Top Coat?
Give the base about five minutes to set before sealing it. Top coat locks in the print and brings back the shine that the alcohol step dulls.
Design Variations
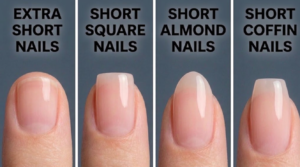
- Short nails: Cut your paper squares smaller than you think you need. Less surface means less room for the print to shift.
- Almond or oval: Center the densest part of the print near the tip, where the eye lands first.
- Square nails: Line the paper up flush with your straight edges for a cleaner border once it’s trimmed.
- Gel or press-on base: The same alcohol-and-paper method works over a cured gel base or a press-on, as long as the surface is a flat, opaque white.
Mistakes to Avoid
Don’t skip the drying time on your white base. A tacky base grabs the paper unevenly and the print comes out patchy.
Don’t reuse the same alcohol-soaked cotton or cup across several nails without checking it’s still wet. Dried-out alcohol won’t lift the ink.
Don’t rush the peel. Pulling the paper off too fast tears the print instead of releasing it.
Product and Tool Notes
The polish and top coat links above are the ones used in this tutorial. Any comparable white polish and clear top coat you already own will work the same way. There’s no product here that’s required to make the technique succeed. It’s the alcohol-and-timing part that matters.
What’s the Verdict?
Worth it if you want a printed look without buying stamping plates or a lamp. Skip it if you’re set on crisp, high-detail images. Paper transfer gives you texture and pattern, not fine lines.
FAQs
Can I use water instead of rubbing alcohol? Yes, but the print will be softer and less defined. Alcohol pulls a sharper transfer because it breaks down the ink faster.
Why do my nails look gray after the transfer? That’s leftover ink sitting on the surface. It’s normal, not a sign you did it wrong, and it fades once top coat goes on.
How long does the design last? About five to seven days with a solid top coat, similar to a regular manicure.
Can I use any paper? Newspaper and magazine cutouts both work. Thinner paper with more ink saturation gives the clearest transfer. Glossy magazine pages can be trickier to peel.
Do I need a lamp or gel system for this? No. This is a regular-polish technique. No cure lamp, primer, or gel system involved.
Is it safe to soak my finger in rubbing alcohol? A short dip is standard for this technique and shouldn’t irritate healthy skin, but avoid it if you have a cut, a rash, or broken skin near the nail.
Check out the paper transfer nail art video tutorial by StylebyZaza:
It’s way easier than it looks, right? Paper transfer nail art is not as complicated as it seems and it’s super budget-friendly too! You don’t need to buy any special materials to get this unique nail art design! Let me know how awesome your paper transfer nails in the comments section!